WordPress is a popular, free content management system used by millions of people around the world to create websites. This article will show you how to speed up a WordPress website using the .htaccess file which is used by Apache web servers to control how your website works.
You can also use caching plugins to speed up a WordPress site for this article we will just be focusing on using the .htaccess file to help you improve your overall website page speed
What is a .htaccess File
A .htaccess file is normally located in the public_html directory of a website and used by apache web servers which is used by a majority of servers to run websites. The .htaccess file basically allows you to make changes to your website’s configuration without having to edit the server configuration files.
What Can The .Htaccess File be Used For
The .htaccess file can be used to do a number of different things including
- Add redirections for certain website URLs
- Optimize the speed our your website using various apache modules including mod_deflate, and mod_expires.
- Load custom error pages, like 404 pages
- Force your site to use HTTPS instead of HTTP
- Password-protect certain directories on your server
- Prevent hotlinking
Where Can I Find The .Htaccess File
The .htaccess file is located in the root directory of your WordPress site. Depending on your hosting provider, the root directory may be a folder labeled public_html, www, htdocs, or httpdocs.
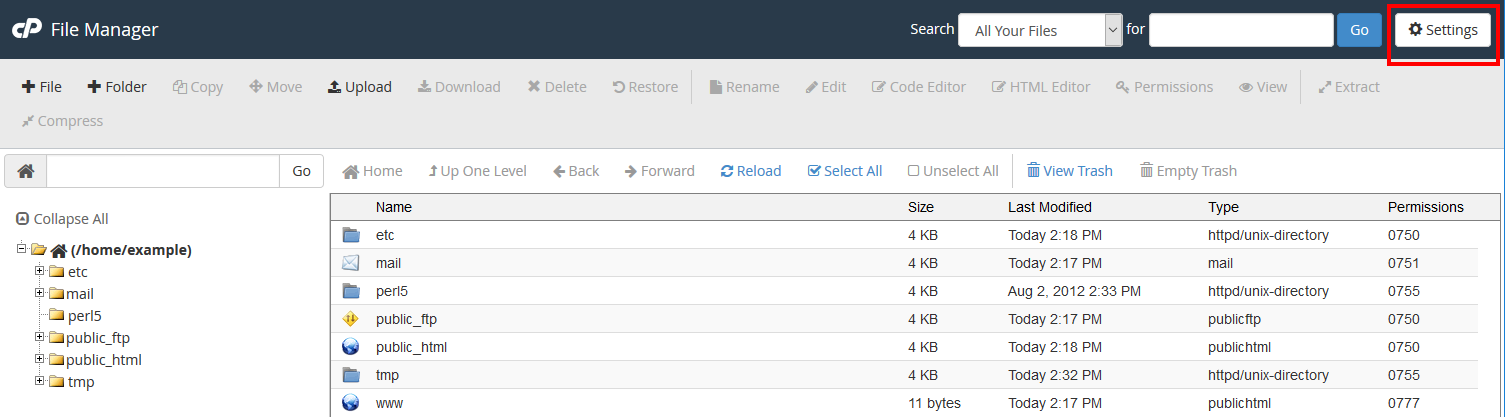
You can locate it by using File Manager in your hosting account’s Cpanel
To access the .htaccess file complete the following steps
- Log into your hosting control panel ( Cpanel )
- Open the file manager
- In the navigation menu on the left-hand side of your screen, click on the public_html folder.
- Look for the .htaccess file which should be located in the public_html directory if you cannot see if the file may be hidden.
- If the file is hidden select the settings option under the file manager
6. A window labeled “Preferences” should now be displayed
7. Select the box labeled “Show Hidden Files.”
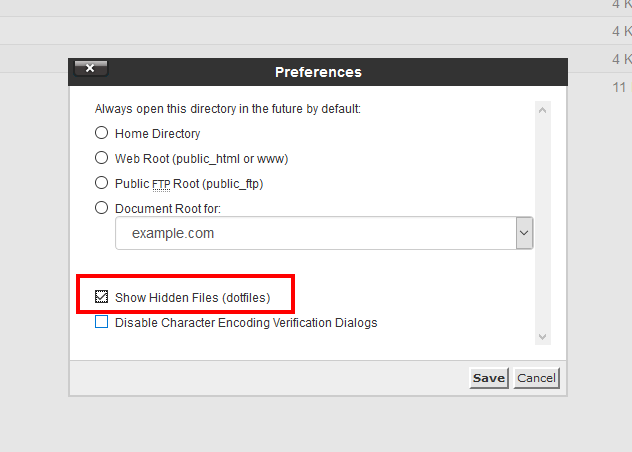
8. You should now see the .htaccess file which you can edit via the file manager.
Updating the .Htaccess File To Speed Up WordPress
Now you know about the .htaccess file and where it’s located you can start to edit the file to speed up WordPress. The following guide and code will help you make the changes to the .htaccess file
To make changes to the .htaccess file you will need to log into your Cpanel and choose file manager and navigate to the public_html directory. From here you will see the .htaccess file. Right-click on the file and choose edit. This will allow you to start making changes to the file by copying and pasting the code below into the .htacess file.
Gzip And Deflate Compression
Compression allows you to reduce the overall size of a document. This approach can be used for compressing HTML files, JavaScripts, CSS stylesheets and XML files. The compression reduces the size of the files by between 60% to 80%
The best way to enable compression is using mod_gzip or mod_deflate for Apache. Both modules basically do the same thing, compress data, but mod_deflate is better supported and also easier to configure. If mod_deflate doesn’t work correctly on your website or web server you can use mod_gzig instead.
Mod_deflate Code
# BEGIN DEFLATE COMPRESSION
<IfModule mod_deflate.c>
# Compress HTML, CSS, JavaScript, Text, XML and fonts
AddOutputFilterByType DEFLATE application/javascript
AddOutputFilterByType DEFLATE application/rss+xml
AddOutputFilterByType DEFLATE application/vnd.ms-fontobject
AddOutputFilterByType DEFLATE application/x-font
AddOutputFilterByType DEFLATE application/x-font-opentype
AddOutputFilterByType DEFLATE application/x-font-otf
AddOutputFilterByType DEFLATE application/x-font-truetype
AddOutputFilterByType DEFLATE application/x-font-ttf
AddOutputFilterByType DEFLATE application/x-javascript
AddOutputFilterByType DEFLATE application/xhtml+xml
AddOutputFilterByType DEFLATE application/xml
AddOutputFilterByType DEFLATE font/opentype
AddOutputFilterByType DEFLATE font/otf
AddOutputFilterByType DEFLATE font/ttf
AddOutputFilterByType DEFLATE image/svg+xml
AddOutputFilterByType DEFLATE image/x-icon
AddOutputFilterByType DEFLATE text/css
AddOutputFilterByType DEFLATE text/html
AddOutputFilterByType DEFLATE text/javascript
AddOutputFilterByType DEFLATE text/plain
AddOutputFilterByType DEFLATE text/xml
</IfModule>
# END DEFLATE COMPRESSION
Gzip Code
# BEGIN GZIP COMPRESSION
<IfModule mod_gzip.c>
mod_gzip_on Yes
mod_gzip_dechunk Yes
mod_gzip_item_include file \.(html?|txt|css|js|php|pl)$
mod_gzip_item_include handler ^cgi-script$
mod_gzip_item_include mime ^text/.*
mod_gzip_item_include mime ^application/x-javascript.*
mod_gzip_item_exclude mime ^image/.*
mod_gzip_item_exclude rspheader ^Content-Encoding:.*gzip.*
</IfModule>
# END GZIP COMPRESSION
Browser Caching
Browser caching is a way of telling your browser to keep the files from a website you visit for a specified period of time on your local machine, or device. When you visit the website again your web browser will used the files stored on your computer or mobile device rather than asking for the files from the website, or web server which makes the website load a lot faster.
To enable caching we can use two Apache modules called mod_expires and mod_headers
Expires headers Code
#BEGIN EXPIRES HEADERS
<IfModule mod_expires.c>
# Enable expirations
ExpiresActive On
# Default expiration: 1 hour after request
ExpiresDefault "now plus 1 hour"
# CSS and JS expiration: 1 week after request
ExpiresByType text/css "now plus 1 week"
ExpiresByType application/javascript "now plus 1 week"
ExpiresByType application/x-javascript "now plus 1 week"
# Image files expiration: 1 month after request
ExpiresByType image/bmp "now plus 1 month"
ExpiresByType image/gif "now plus 1 month"
ExpiresByType image/jpeg "now plus 1 month"
ExpiresByType image/jp2 "now plus 1 month"
ExpiresByType image/pipeg "now plus 1 month"
ExpiresByType image/png "now plus 1 month"
ExpiresByType image/svg+xml "now plus 1 month"
ExpiresByType image/tiff "now plus 1 month"
ExpiresByType image/vnd.microsoft.icon "now plus 1 month"
ExpiresByType image/x-icon "now plus 1 month"
ExpiresByType image/ico "now plus 1 month"
ExpiresByType image/icon "now plus 1 month"
ExpiresByType text/ico "now plus 1 month"
ExpiresByType application/ico "now plus 1 month"
# Webfonts
ExpiresByType font/truetype "access plus 1 month"
ExpiresByType font/opentype "access plus 1 month"
ExpiresByType application/x-font-woff "access plus 1 month"
ExpiresByType image/svg+xml "access plus 1 month"
ExpiresByType application/vnd.ms-fontobject "access plus 1 month"
</IfModule>
#END EXPIRES HEADERS
Cache-Control
# BEGIN Cache-Control Headers
<ifModule mod_headers.c>
<filesMatch "\.(ico|jpe?g|png|gif|swf)$">
Header set Cache-Control "public"
</filesMatch>
<filesMatch "\.(css)$">
Header set Cache-Control "public"
</filesMatch>
<filesMatch "\.(js)$">
Header set Cache-Control "private"
</filesMatch>
<filesMatch "\.(x?html?|php)$">
Header set Cache-Control "private, must-revalidate"
</filesMatch>
</ifModule>
# END Cache-Control Headers
Litespeed Caching
If your using Litespeed which is an add-on for apache you will need to use this code in the .htacess file for caching
# ENABLE LITESPEED CACHE START
<IfModule LiteSpeed>
CacheEnable public
RewriteEngine On
RewriteCond %{REQUEST_METHOD} ^GET|HEAD$
RewriteCond %{HTTP_HOST} ^sample.com|sample.net|sample.org [NC]
RewriteCond %{REQUEST_URI} !login|admin|register|post|cron
RewriteCond %{QUERY_STRING} !nocache
RewriteRule .* - [E=Cache-Control:max-age=300]
</IfModule>
# ENABLE LITESPEED CACHE END
Speeding Up WordPress by Enabling Keep-Alive
Enabling Keep-Alive is another great Htaccess trick to speed up a WordPress website. It enables your server and web browser to download resources on a single connection, hence it increases page speed. You can enable Keep-Alive by adding ‘Connection: keep-alive HTTP header in your server.
To enable keep_alive to add the following code to the .htacecss file
# START ENABLE KEEP ALIVE
<ifModule mod_headers.c>
Header set Connection keep-alive
</ifModule>
# END ENABLE KEEP ALIVE
By adding the above code to the .htaccess for your WordPress website you will see a big improvement in the overall speed of the website.